Monday, March 28, 2011

DIY: cupcake stands!

Who doesn't love a good cupcake? I mean SERIOUSLY, I love cupcakes. Unfortunately, cupcakes do not play a big part in my Weight Watchers lifestyle change :) (More on my WW journey in another post!)

But, for a birthday party, cupcakes have become my favorite way for everyone to have their own little mini birthday cake. On a trip to my favorite Dollar Tree I started brainstorming ways to copy my Pottery Barn cupcake stand that I picked up several years ago. I only had one because I'm pretty sure they were rather expensive. For K's upcoming birthday there will be 4 kiddos so I could easily afford to make a cupcake stand for each kid. With supplies and the glass, I make all 4 of these cupcake stands for about $15! WAYYYY less than what I paid for 1 of the PB cupcake stands.

Supplies:

glass candlestick, round candle plate and glass vase ($1 for each piece from the Dollar Tree)

E6000 glue

spraypaint

hot glue

ribbon

scrapbooking paper


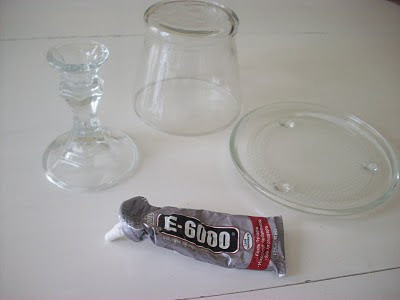
Step 1: Glue the round candle plate to the candlestick with a generous amount of E600 glue. Let dry overnight.


Step 2: Spray paint your glued piece in your choice of color. I did 2 pink and 2 gray for the 2 girls and 2 boys that will be at the party.


Step 3: Hot glue a piece of ribbon around the vase that will become the dome on the stand. This helps distract from the fact that it is actually a vase :)


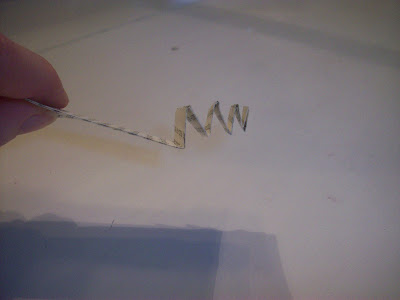
Step 4: Cut circles from scrapbooking paper. I chose to cut two different sizes of circles and stack them to incorporate the book pages that I'm using throughout the party decor.


Step 5: Place the circles on the top of the stand. As a note of caution, do NOT put food directly on the cupcake stand if you spray paint it. The scrapbooking paper serves as a barrier, and the cupcakes will be in a cupcake wrapper. Just being extra cautious!


Step 6: Place your treat on the stand and put the dome on top. (I didn't have any cupcakes handy, but you get the idea with Kate's wooden petit fours!)


And that's it! A delightfully simple and adorable way to make your cupcakes look extra special! A new friend I met through my blog sent me a link to the most delicious looking mint julep cupcakes that will be making an appearance at the party. For the kiddos though, I'm going to splurge on a few Abby Girl Sweets cupcakes....and maybe sneak one for myself. (1 cupcake = bazillion Weight Watchers points, but who's counting?)


Next DIY post: Treat buckets! I'm starting to feel the pressure on getting stuff done for the party. Only about 6 weeks left and SO much to do. Besides all of the party planning going on, we are still looking for a renter and starting to pack up some things in our house. We've been having quite a few showings so between packing, constantly cleaning and having house showings I've been slacking on the party planning. In other exciting news, our blueprints for our new house will be done next week!!!!! YIKES!!!! Somebody rent our house!!!

Monday, March 14, 2011

DIY: equestrian ribbon invites

This first tutorial for Kate's birthday preparations is focusing on invitations. Invitations most certainly set the scene and mood and are your guests first impression of how awesome your party will be! When you send or hand deliver an invitation that is worth hanging on to or even worthy of refrigerator real estate then you've set the stage for a great party! I racked my brain for a long, long time to try and think of something that would be worthy for a vintage derby party. I haven't been super impressed with a lot of horsey type derby images so I continued to search for the perfect way to invite our guests to a lovely afternoon of horse racing. Through a google image search I found this blog that caught my eye. Although this project was originally intended for a halloween project I knew I could take it and make it perfect for Kate's invite. So, here I give you the tutorial for making equestrian ribbon invites :) Enjoy!

Supplies:
page from a book
scalloped punch
2 inch circle punch
hot glue
ribbon (I used 2 different widths)
fabric scissors
paper trimmer
black cardstock
print out of number (Click here to download the numbers from domesticfluff.com

Step 1:
I trimmed 2 strips from the book page on my paper trimmer that were the same width

Step 2:
Stack your 2 strips on top of each other and begin your accordian fold making small pleats. Crease them so the edges are crisp.

Step 3:
Seperate the two strips and put them end to end. With a dab of hot glue make 1 long strand of accordian folds.

Step 4:
At this point, punch a 2 inch circle from your black cardstock and layer with a scalloped punch number.
Step 5:
Connect the 2 ends of your accordian folded book page together. Push the circle flat and gather the points in the middle.

Step 6:
Glue your number circle into the middle of your accordian and hold until the glue sets.

Step 7:
Cut 2 of the same lenghts of each color of your ribbon. Stack and glue them to the back of your rosette.
Step 8:
Cut points into your ribbons
Step 9:
Hot glue your rosette to the ribbons
Step 10:
I covered the back of the invitation with another black cardstock circle to cover the ribbon. I will add a smaller white cardstock cirlce to the back of the invite with the information for the party at a later date.
So that's it! Easy peasy right! I plan on using these cute equestrian ribbon rosettes on other things for the party. Next party prep project is individual cupcake stands! See you next time :)

Sunday, March 6, 2011

a last ditch effort

I had told you that we were going to meet with a few realtors to put our house back on the market in an effort to take advantage of what is supposed to be "the busy season" of real estate. So. last week almost every night we met with one realtor after another.

Nice? Sure. Competent? Sure. Expensive? Uh...yeah.

After each one left, we sat with the calculator running every scenario that we could think of. Basically what it boils down to folks is we just can't part with this house for what could be a HUGE hit to our equity. So, what next? We were stumped.

In the past we'd had more interest in renting our house than we ever had in buyers. Which was strange, because we never had said that was an option because we didn't think it would be. We started tossing the idea around of leasing our house for a few years with the hope that the market would improve at some point and then we could relist our house for sale. Or if the market doesn't improve...well then, I guess we'll have ourselves a fine rental house. Of course our biggest concerns were: (1) are we {financially} able to do this; and (2) what if we get horrendous renters that trash our house. Both scary, scary things to think about.

We first contacted our mortgage folks to see if it was even something we could consider. 2 days later we got the word that it would not be a problem. We've also been in contact with property management companies so that Joey and I would not be bothered with phone calls at 2am because a toilet is overflowing. They will also take care of the contract, background checks, maintenance, inspection checks on the house, and well, pretty much everything. So long as we can procure renter(s) then we are on our way to breaking ground!

It's so exciting, but also nerve wracking! We've already had more interest in the few days that our house has been available for lease than when it was for sale. So, a good sign right? Let's hope!

Here's a pick of our house to be! This is the model home, so ours will be different, but you get the idea :)

Thursday, March 3, 2011

a very vintage derby birthday

In less than 3 short months I will be the mother to a 2 year old little lady. Wow. How on EARTH did that happen? I swear it seems like just a few minutes ago I was planning her first birthday party extravaganza and it seems like only a few weeks ago that I was headed to the hospital to endure what surely can go down in the record books as the world's longest labor and delivery. (4 days. That's right I said 4 days!)

I've always loved planning parties and these little celebrations of birthdays for Kate have been by far my favorite :) You'll remember for Kate's first birthday party I planned a candy themed party. We had tons of yumm-o candy, cupcakes, and other sweet treats. The weather was less than desirable, cold and SO WINDY, but of course, we had no back up plan, so we just sucked it up and dealt with the hurricane force winds at the park! At least the sun was shining and the kids had a blast playing on the playground equipment. Since the weather is SO unpredictable in Kentucky during the spring months, I'm going to play it a little on safe side and plan for an indoor celebration this May 7th. If the weather cooperates I'll just scoot everything outside. The next dilemma is where to have this soiree? Of course, at this point, it's looking like having the party at our NEW house is out of the picture. That narrows it down to having the party at our current house (if we are still there) or maybe at my mom and dad's? They obviously have plenty of room (see my previous post) and I've been lucky enough to host a party or two under the trees at the farm.

So, on to the fun stuff. Themes! Decorations! What to wear?! By way of background, let me share with you a cute, little endearing story.

Scene: driving to the hospital on May 4, 2009 to be induced

Act 1: May 4, 2009

Husband: This is AWESOME! Kate is going to be such a lucky girl to have a birthday on Cinco de Mayo AND Derby at some point.

Me: I know, right? It will be awesome!

Act 2: May 5, 2009 (late in the day)

Husband: Well, okay, so Kate didn't make it on Cinco de Mayo, but that's okay, she'll still have a birthday that will eventually fall on derby. AWESOME!

Me: Yay. (Obviously disappointed that the induction medicine was not working and that I was still large and preggers and quite uncomfortable)

Act 3: May 6, 2009 (late in the day)

Huband: I mean, I'm starting to get nervous. If Kate doesn't get here soon she will NEVER have a birthday that falls on derby! So, you've got like 1 more day to have her, even if her birthday is on the 7th at least there will be a derby day on the 7th day of the week.

Me: I'm not real sure if I even said anything or was looking for a sharp object in the hospital room to stab him with. I could have cared less what day this child's birthday was going to fall on as long as it was coming SOON.

Act 4: May 7, 2011 (3:51 am) She's FINALLY here!

Husband telling everybody: It will be so great that Kate's 2nd birthday will be on Derby. I can't wait!

Me: No words, just rolling my eyes.

So, there you have it folks. TWO years in the making and our little Joey, I mean Kate, gets to have her Kentucky Derby party. Of course, we can't just have our families over to watch the Run for the Roses, we have to have a proper Kentucky Derby/Birthday party soiree! Since my mom hails from outside of Louisville and had a pretty good stash of vintage Kentucky derby paraphernalia, I've decided that a lovely pink, gray and sepia colored palette will serve as the background for the party. In an effort not to make this post so incredibly long and painfully boring, I'll share pictures of things I've been collecting in a few more posts along with fun DIY projects. Then make sure you check back sometime after May 7th for the full report! Giddy up!

(Where it all began...2 years ago 5/7/9)