Thursday, January 27, 2011

sit and stay a while at sew this is my life

One of my goals for 2011 was to introduce you all to some of my favorite bloggers. My hope is that you will visit (and visit often) these spectacular blogs that I love reading everyday.

So, here we go!

My first blog that I would love for you all to sit and stay a while is the lovely Cristin of


I had the great fortune of meeting her at the craft show that Misty and I did in early December and let me tell you, she is so talented and even better yet, so sweet! Make sure you also visit her etsy site, Hazelnut Designs and snag some of her ADORABLE mug rugs, quilts, hand towels and baby items. We are SO looking forward to having Cristin join us at the first annual Birds of a Feather Fair as one of our top picks! Add Cristin's blog to your daily blog reads, I'm sure you'll enjoy her adventures in quilting, crafting and raising her adorable little boy! So, cheers to Cristin, one crafty little lady!

Friday, January 21, 2011

a little crush...

I have to admit...I have a little crush. You know that feeling you get when you meet someone new and you can't wait to see them, spend time with them and you get all giddy talking about them? That's right Dollar Tree, I'm talking about YOU! In the past 6 months or so I've really fallen head over heels with the Tree. I'm surprised the clerks at the store don't know me by name because I am there AT LEAST once a week. If you are a crafter or just a bargain hunter, the Tree is such an awesome resource! The good ol' Dollar Tree can almost always help feed my crafting addiction by offering supplies so I can try (and sometimes epically fail) lots of projects. So, today, I'm posting this tribute to my dear friend, the Dollar Tree.

10 reasons why I heart the Dollar Tree:

1. Supplies. You can't beat the essentials that you can find here. Tape, glue, wreath forms, it's a crafter's paradise.

2. Frames. I don't think it's any secret, but now it's really not, but the Tree is where I get my cute little 7x7 frames and easels and turn them into chalkboards.

3. Trays. As previously mentioned in this DIY post, these nickel plated trays after being spray painted in bright, fun colors have been a huge hit.

4. Candy! Where in the world was I last May when I needed about 15 big lollipops for Kate's birthday party? I am shuttering to remember how much I spent at some gourmet candy store on the lollis.

5. Favors. Again for Kate's birthday party! Why didn't I think to check here???!!! These ADORABLE little gum ball machines would have made insanely cute party favors. Tied with a little ribbon and a tag with each kids' name, so cute!

6. Swiss cake rolls. Okay, so it's a guilty, VERY guilty pleasure. There may have been one occasion on a major supply shopping trip to the Tree that several off the swiss cake rolls were missing by the time I got home. I have NO idea how this happened.

7. Glassware. I'm crushing on these sturdy beer steins, just waiting for a little glass etching cream and a mustache stencil.
8. Random. Yet another reason why I love the Tree, you can always count on finding different fun little trinkets every time you go!

9. Repurposing. You could use these three objects as they are intended, a candlestick, a candle plate and a glass vase, OR....with a little glue you could have an adorable cupcake or treat stand!

10. Party! No matter if you are planning a birthday party, any holiday celebration or even a wedding I challenge you to get to your local Dollar Tree and see what you can create! I found these cute little trophies that might need a spraypaint makeover for Kate's vintage derby birthday party!
Cheers to you Dollar Tree! You are awesome!

Thursday, January 13, 2011

DIY: part 2 of project book

This week has been a little crazy with snow here in the NKY, so sorry that I'm just getting around to posting this. I'm bringing you two more ideas of how to repurpose books! Enjoy :)

DIY Project #3 - book pages wreath
I experienced some serious heart palpitations the first time I saw this wreath on this incredibly fun blog and couldn't wait to try one myself. You'll find the best tutorial here, but I'll give it a whirl too. Livingwithlindsay also has a short YouTube video on how to fold the pages.
Step 1: Grab a Styrofoam wreath and some hot and steamy romance novels from the good ol' Dollar Tree

Step 2: You can either paint the edges of the book to give it a more vintage feel, or do as I did and get out your ink pad and ink up the sides. (You can take the girl out of her scrapbooking phase, but you can't take techniques out of the girl)
Step 3: Remove the inked pages from the book
Step 4: For the first layer of pages, make and "s" shape with your page and scrunch the bottom of the page
Step 5: Get your trusty glue gun and begin gluing your pages closely together to the wreath. Complete one side and turn over. This will be the back of your wreath


Step 6: Continue to fold pages into an "s" shape but for the front side of your wreath you'll want to fold a tab.
Step 7: After completing one row all the way around, start a new row of pages with tabs.

Step 8: Once you've glued enough to reach the middle of the wreath do one more row to finish the inside similar to how you folded your pages for the backside of the wreath.

Step 9: Fill in any holes to fill out the wreath
Step 10: Use some pretty ribbon to hang your wreath up!
Once I finished this one my mind was racing on other variations of this wreath. What about tea stained sheets of music, what about scraps of beautiful scrapbooking paper???? I had to make another one because I couldn't sleep at night for the ideas running wild in my head. So, I finally broke into my gorgeous stash of Amy Butler paper that I've been saving for.....well I really don't know what Iwas saving it for, but I was being stingy and didn't want to use it. I cut each 12x12 page into 6x6 squares and got to work. I L-O-V-E the way it turned out! I'm going to go a little Amy Butler wild in Kate's big girl room, but we are going to wait to do that transition when we move. But, I just couldn't resist hanging it on her door.
DIY Book Project #4 Book Mobile

I saw this online somewhere are some point and time and now I can't find it and have no idea where I saw it. I've had a picture cut out in my idea scrapbook for several years now. Sorry I can't give props where props are due, but hope I can do the originating artist justice!

Step 1: While at the Dollar Tree buying all kinds of other goodies, grab a hardback book.

Step 2: {Optional step} paint or ink the edges if you want.

Step 3: Rip out ALL of the pages from the spine of the book.

Step 4: Begin folding pages in half without creasing the fold and use hot glue or double sided tape to hold the page together
Step 5: Using hot glue, start in the middle of the spine and start laying your folded pages. Work down as well to give the mobile some length.

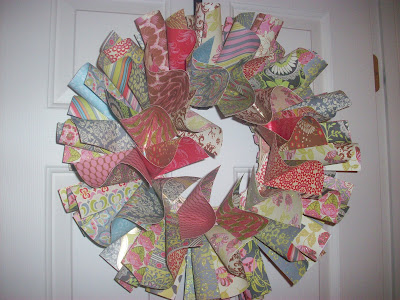
Step 6: Fill in pages so that the book flaps will stay open

Step 7: Once the mobile is to your desired width and length take a piece of fishing line to hang the mobile. I ran my line from front to back and tied at the top.

Step 8: Hang your mobile and pat yourself on the back for being so crafty :)

I want to make several of these in different sizes for our library/craft room in our new house. But, in an effort to not have so much stuff to store I'll just make more later. But think how lovely 3 or 4 of these would be hanging at different heights. Awesome.

Friday, January 7, 2011

DIY: part 1 of project book

I vowed to put down the hot glue gun for a few weeks after all of my craft show madness was over and to focus on spending time with the family for the holidays. Now that the holidays are over I've been itching to plug that sucker back in and get crafting! This DIY is a compilation of a few quick projects all using one common material: books. I have several projects and in an effort to not make this post insanely long, I'll split them up into 2 posts.

Now, I know, I know, I'm sure some of you out there are cringing to think that I'm about to tear apart a book. Well, sometimes in the name of crafting, you have to deface a dollar store romance novel or two!

DIY Project #1 - romantic book flowers

You may remember these flowers from my own rendition of Tasha's ornament bud vase from Day 8 of the 12 Days of Christmas. I'm using a technique that is easy as pie for making rolled flowers.

Step 1: Using 2-3 pages out of a book, cut into a square. Obviously the larger your square the larger your flowers will be.
Step 2: Once you have your stacked square of pages, take a pencil and beginning from the middle of your page, start drawing a spiral shape outward.

Step 3: Using a pair of scissors, start cutting along the spiral from the outside point in toward the middle. You will end up with a little tab in the middle.

Step 4: Begin rolling the flower inward and secure with a glue dot every once and awhile. That tab at the end will be good for covering the back of the flower.

Step 5: Paint your flower with a bit of glue and dip into glitter
Step 6: Cut some leaves from any scraps and voila!

DIY Project #2 - pottery barn inspired book stack
Browsing through my Pottery Barn catalog I saw a bowl full of lovely stacked books that caught my eye. They were bound together 4 at a time and classically simple...and a little overpriced! Around $40 for the set!!! For reals???? So I broke out my stack of $1 store book finds and got to work! The whole project cost me a whopping $4.

Step 1: Remove the front and back covers from your paperback books along with as much of you can of the spine.
Step 2: You could tea stain the sides of each book, but I used a brown ink pad to rub over the sides of the books and covers. Much quicker and less messy. To ink the cover of each book I took a paper towel and blotted it onto the ink pad and lightly rubbed onto the book.
Step 3: Stack your books together
Step 4: Tie with a piece of twine and any embellishments


Thanks PB! Love the idea, but I'll hang on to my $36 for something else in your store:)
Next week I'll post Part 2 of Project Book because I have 2 more awesome projects to show you! Have a great weekend!

Tuesday, January 4, 2011

2011 - a fresh start


The new year always brings a promise of a fresh start, a clean slate and a blank calendar. I love sitting down at the beginning of each new year with a fresh, clean, blank agenda. Doesn't everything seem possible? No to-do lists yet, no obligations, just an empty canvas to create your own year.
I sat down on New Year's Day with a cup of peppermint hot cocoa, my new 2011 Kate Spade planner with my mug rug from a new crafty friend. I filled in birthdays to remember, possible dates for the Birds of a Feather Fair and even best yet, my paid time off for the year :)
So this year I hope that you will sit down with your new agenda for 2011 and look forward to the opportunity to make your year the best one yet!
Hope you all have a great day today and be on the look out for a new DIY project coming soon!

Saturday, January 1, 2011

2011 - take more risks!


Happy New Year! I hope that this year brings happiness to your heart and good health to you and your family. Every year, the same thing, I make resolutions and usually end up abandoning them along the side of the road by about....oh....January 11th or so. Well this year my resolution is to:

"TAKE MORE RISKS!"
In the spirit of that, 2011 is going to be a very BUSY and exciting year for me and my dear friend Misty of Jewelry by Misty. I have just been bursting at the seams to shout our announcement from the roof tops but figured today of all days would be a very poignant time to finally announce the creation of the first annual

Birds of a Feather Fair!!!!!!!!

So, what does this mean you ask?


Well.....coming early November 2011 to a Northern Kentucky location near you Misty and I are producing quite possibly the biggest and BEST modern handmade show in Northern Kentucky area! We are just so excited to begin working on all the details. We will reveal more about the date, location and vendors in the coming weeks as we still need to nail down some of the details. I will be posting updates to the Jar's blog and Facebook page and we will eventually get the Birds of a Feather Fair website up and running along with Facebook and Twitter accounts.

So, why Birds of a Feather?

Another great question! You've heard the saying "birds of a feather stick together" and as veteran craft show participants, Misty and I have decided that there needs to be an outlet and forum for those MODERN handcrafters out there like us! We've done the church and school craft show circuit and while they are very nice, we've only been impressed with a handful of vendors at each show. So, we are cutting out the crocheted toilet paper covers and bringing you only the most hip and fresh crafters.

Some vendors have already been handpicked by us and will be on our fresh pick list, but no worries if you are interested in being a vendor, we will have applications ready soon. The show will be a juried event, which means a review committee will process each application and look at submitted pictures and/or websites. We want to ensure that we have plenty of variety too! For our first year we are looking for 50 vendors and will hopefully continue to grow and include more artists every year.

In the meantime, start spreading the news and if you know anybody who would be interested in being a vendor or if you are really a dear friend and want to become a volunteer give us a shout!


Birds of a Feather Fair 
Peace. Love. Craft.