
This week has been a little crazy with snow here in the NKY, so sorry that I'm just getting around to posting this. I'm bringing you two more ideas of how to repurpose books! Enjoy :)
DIY Project #3 - book pages wreath
I experienced some serious heart palpitations the first time I saw this wreath on this incredibly fun blog and couldn't wait to try one myself. You'll find the best tutorial here, but I'll give it a whirl too. Livingwithlindsay also has a short YouTube video on how to fold the pages.

Step 1: Grab a Styrofoam wreath and some hot and steamy romance novels from the good ol' Dollar Tree
Step 2: You can either paint the edges of the book to give it a more vintage feel, or do as I did and get out your ink pad and ink up the sides. (You can take the girl out of her scrapbooking phase, but you can't take techniques out of the girl)

Step 3: Remove the inked pages from the book
Step 4: For the first layer of pages, make and "s" shape with your page and scrunch the bottom of the page

Step 5: Get your trusty glue gun and begin gluing your pages closely together to the wreath. Complete one side and turn over. This will be the back of your wreath


Step 6: Continue to fold pages into an "s" shape but for the front side of your wreath you'll want to fold a tab.

Step 7: After completing one row all the way around, start a new row of pages with tabs.
Step 8: Once you've glued enough to reach the middle of the wreath do one more row to finish the inside similar to how you folded your pages for the backside of the wreath.
Step 9: Fill in any holes to fill out the wreath

Step 10: Use some pretty ribbon to hang your wreath up!


 Once I finished this one my mind was racing on other variations of this wreath. What about tea stained sheets of music, what about scraps of beautiful scrapbooking paper???? I had to make another one because I couldn't sleep at night for the ideas running wild in my head. So, I finally broke into my gorgeous stash of Amy Butler paper that I've been saving for.....well I really don't know what Iwas saving it for, but I was being stingy and didn't want to use it. I cut each 12x12 page into 6x6 squares and got to work. I L-O-V-E the way it turned out! I'm going to go a little Amy Butler wild in Kate's big girl room, but we are going to wait to do that transition when we move. But, I just couldn't resist hanging it on her door.
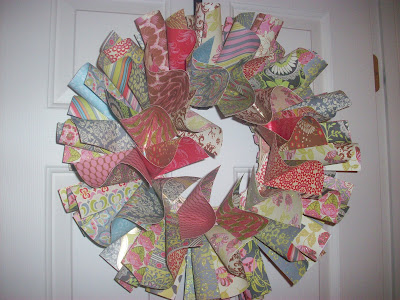
DIY Book Project #4 Book Mobile
I saw this online somewhere are some point and time and now I can't find it and have no idea where I saw it. I've had a picture cut out in my idea scrapbook for several years now. Sorry I can't give props where props are due, but hope I can do the originating artist justice!
Step 1: While at the Dollar Tree buying all kinds of other goodies, grab a hardback book.

Step 2: {Optional step} paint or ink the edges if you want.
Step 3: Rip out ALL of the pages from the spine of the book.

Step 4: Begin folding pages in half without creasing the fold and use hot glue or double sided tape to hold the page together 
Step 5: Using hot glue, start in the middle of the spine and start laying your folded pages. Work down as well to give the mobile some length.
 Step 6: Fill in pages so that the book flaps will stay open
 Step 7: Once the mobile is to your desired width and length take a piece of fishing line to hang the mobile. I ran my line from front to back and tied at the top.

Step 8: Hang your mobile and pat yourself on the back for being so crafty :)

I want to make several of these in different sizes for our library/craft room in our new house. But, in an effort to not have so much stuff to store I'll just make more later. But think how lovely 3 or 4 of these would be hanging at different heights. Awesome.
1 comment:
okay, you're officially ready to design windows for Anthro!
Post a Comment